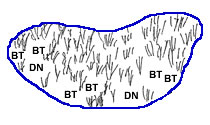
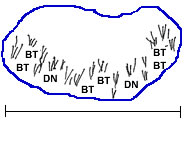
Setting Bottletraps
1. Use 6
bottletraps per site. Set the traps out in 3 pairs, the mebers of each pair about 3-6 ft. apart.
Spread
the 3 pairs along the shore, with pairs roughly 20ft. apart. You will combine the data
from
all 6 traps for metrics.
2. Put at least 2 of the traps in very shallow water near shore, the others in shallow
water not deeper
than about 2-3 ft.
3.
Set the traps 2 nights before collecting them. Be aware of rain events prior to bottle placement and
after. Wetland
water levels can fluctuate quickly.
4. Fill traps with water with no air bubles (tip trap under water so bubbles
escape).
5. Press funnel into trap opening so it snaps in tightly. Again, remove air bubbles.
6. Lower
bottle on dowel, orient bottle horizontally in water.
7. Put bottletraps about one hand length under the water.
Collecting Bottletraps
1. Collect each pair
of bottletraps each into one jar (3 jars total for 3 paris of BTs), unlees the sample
occupies
more than 1/4 volume of the jar. If so, use a second jar.
2. Raise trap up the dowel, remove the funnel, pour
the trap contents through your sieve.
3. Dislodge any critters stuck to the inside walls of the bottle. What's
on the outside of the bottle
is not part of the sample.
4.
Collect the second trap of the pair, and pour contents into sieve.
5. Backflush the contents of the sieve into your
sample jar with 95% alcohol.
NOTE:
a. If you have alot of leeches or other ogranisms in your traps, you may need to use more jars
to preserve the sample.
b. If you have fish,
tadpoles or salamanders you should note these on your field data sheet and
leave them at the site. Note approximate numbers.
6. Label properly. Put pencil or India
ink label inside the jars. Label outside for convenience. See further labeling information below.
Collecting a Dipnet (DN) Sample
You collect one dipnet
sample per site. Each DN sample consists of two dipnetting efforts. Dipnet in the near-shore
shallow areas in water up to one meter deep. "Sample close to edge and in the veg." Use a 12 x 16" wood framed
1/2" hardware cloth screen over a tray (or 2 Coleman cooler trays) of water. The tray(s) of water should sit within
a larger kitty litter pan or dishpan. This can float on the wetland.
FIRST DIPNETTING EFFORT
1. Put water in your collecting
pans that sit underneath your hardwary cloth screen.
2. Place the framed hardware closth
screen over the water so its edges don't hang over the edge of
the
pans. This way the critters go down into the water in the pans.
3. Hold the
long-handled dip net vertically, one hand near net, one hand up handle.
4.
Using stron strokes, sweep the net through the water towards you about 3-5 times.
5. Be
sure to sample right into the vegetation near shore.
6. Evert all of the net contents
onto the hardware cloth screen. Get everything out of the net.
7. Spread the vegetation,
loosen it. Do this periodically for up to 10 minutes. This allows the
critters to get down into the water in the pans.
8. After 10 minutes, remove the vegetation
and do the second dipnetting effort.
SECOND DIPNETTING EFFORT
1. Move to a different shallow area.
2. Repeat the steps described in 1-7 above.
3. After spreading out the vegetation
for 10 minutes, remove it, and pour the water from the
collecting pans
through your sieve. Be sure to dislodge the leeches and snails which might
attach to the pan.
4. Backflush the sieve contents into your sample jar with 95% alcohol.
Be sure to get any critters
which attach to the sieve walls.
Use two jars if critters and debris occupy more than 1/4 of the
jar
volume.
Sample Labeling
1. Record sample code on field data sheet,
especially if different from site name.
2. Use pencil or truly permanent India ink on 100% cotton
cardstock or index card.
3. Indicate Site Name, Sample Code, Date, County, Collector's name, if DN or BT sample.
Indicate
if there is more than one jar--jar #1 of 2, jar #2 of 2.
4. Place label INSIDE
jar. This is the only label you trust.
5. For convenience, label also on the outside of the jar.
6.
Remember alcohol is falmmable. Keep lids tight. Store away from flame or heat.